How to Plan a Productive Vegetable Garden (Step-by-Step)
Planning a vegetable garden feels overwhelming when you're staring at blank space and a pile of seed packets. How much should you plant? Where does everything go? When do you start seeds vs. direct sow?
A productive garden isn't about growing the most plants. It's about using space efficiently, planting in succession so you harvest continuously, and tracking what actually works so you can improve each year.
Here's the step-by-step process I use to plan my garden, using Giddy Carrot to keep everything organized.
Step 1: Start with What You Actually Eat
Don't plant things just because they're easy to grow or because the seed packet looked cool. Plant what you actually eat regularly.
Make a list of vegetables, herbs, and fruits your household consumes. Be honest. If you don't eat kale, don't grow kale just because it's trendy. If you go through a pound of tomatoes every week, prioritize tomatoes.
Your list might look like:
- Tomatoes (lots)
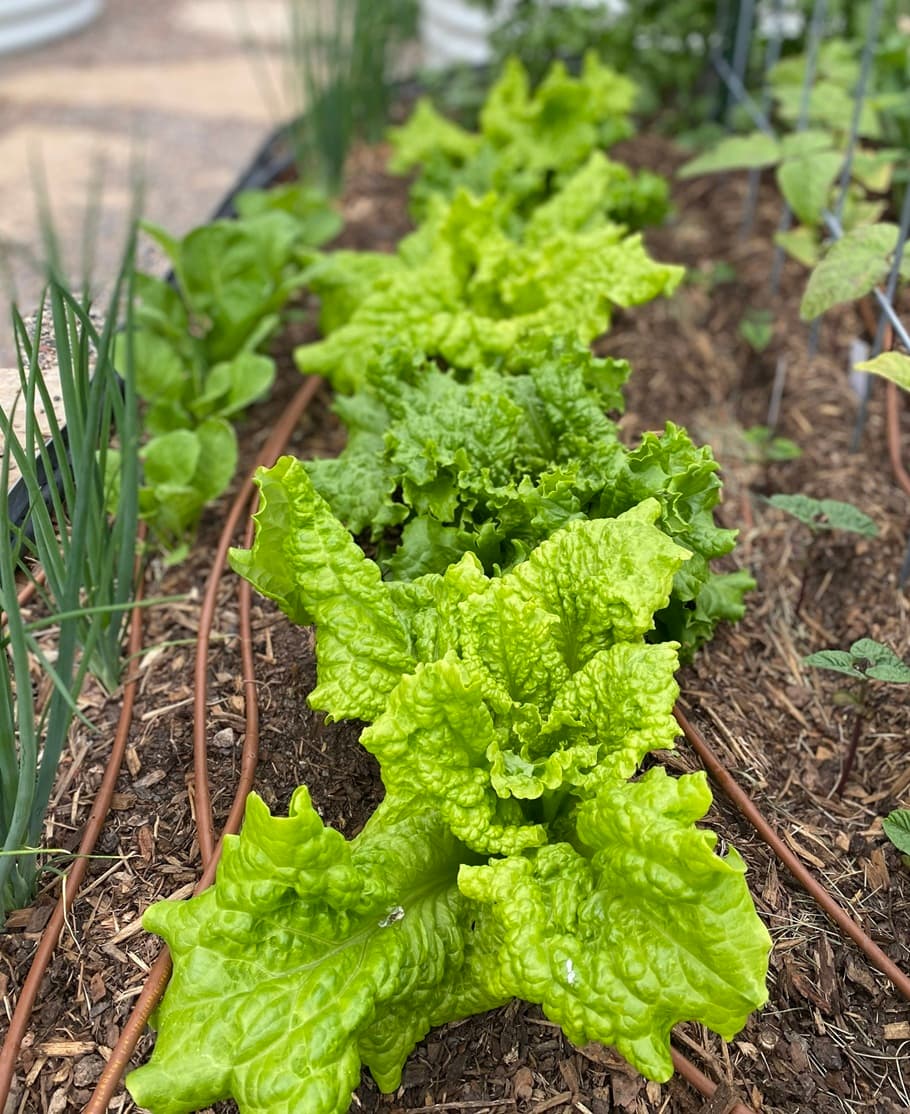
- Lettuce (continuous harvest)
- Peppers (mix of bell and hot)
- Cucumbers
- Zucchini (maybe just 1-2 plants, they produce heavily)
- Basil
- Cilantro
This becomes your priority list. Everything else is secondary.
Step 2: Add Your Seeds to Giddy Carrot
Before you can plan layouts or planting schedules, you need to know what seeds you have.
In Giddy Carrot, go to the Seeds & Plants section. Add each variety you plan to grow:
- Plant name (e.g., "Tomato")
- Variety name (e.g., "Cherokee Purple Tomato")
- Quantity (how many seeds or plants you have)
- Category (vegetable, fruit, herb, flower)
- Season (cool season, warm season)
Optional fields that improve accuracy: You can also add details like days to harvest, typical start method, and how many weeks to start indoors. These help the app give you more accurate planting date estimates based on your specific climate. If you're a seasoned gardener who already knows your timing, you can set planned start and transplant dates once and the app will use those instead of estimates. There's also a notes field for any variety-specific information you want to remember.
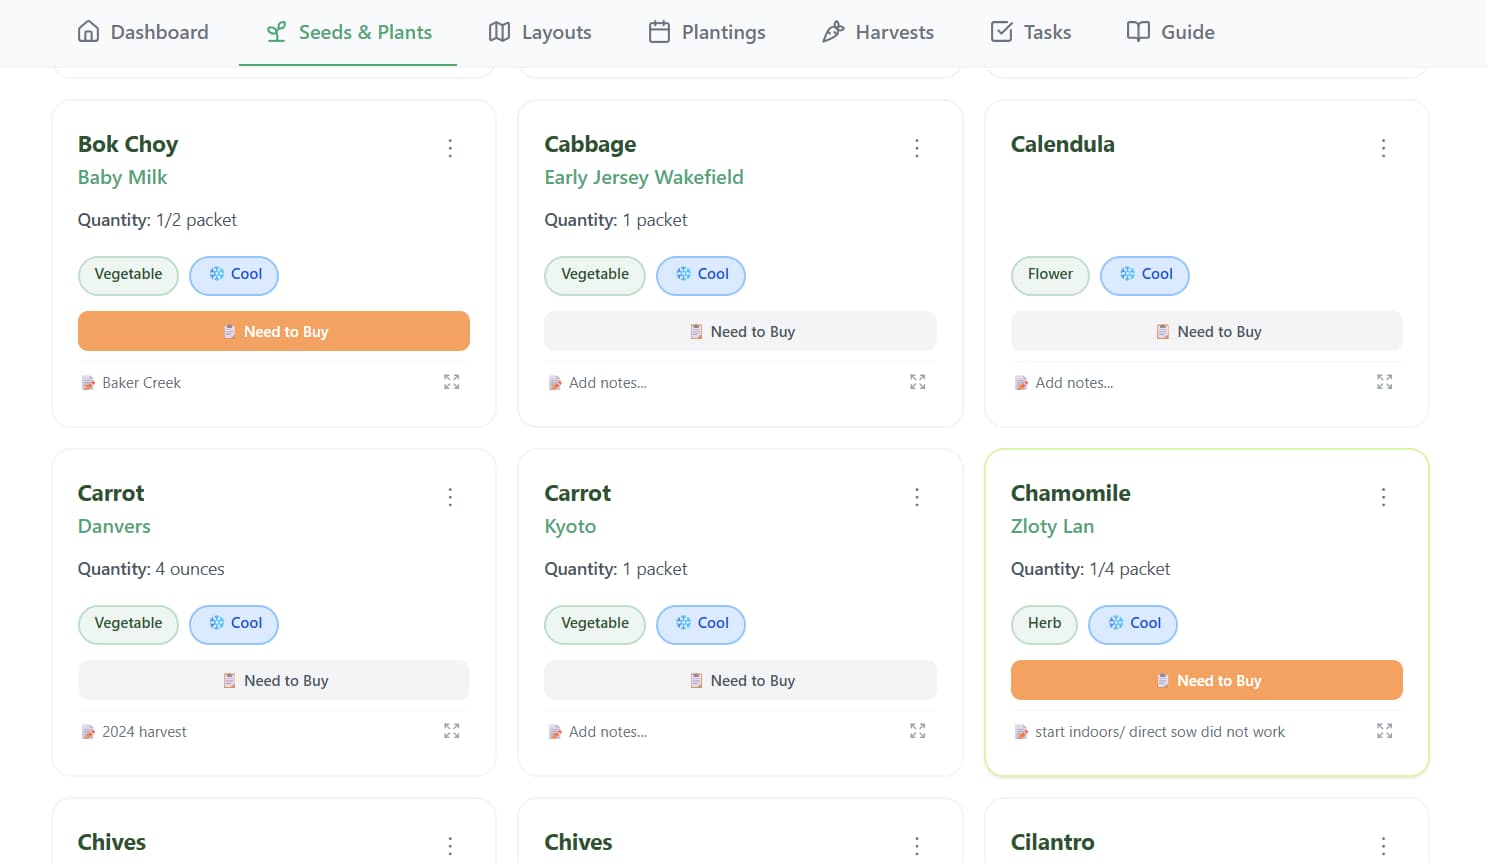
Once your seeds are in the system, you can filter by season and category. This helps when you're planning because you can quickly see all your cool-season crops or all your herbs without digging through physical packets.
You can also track how many seeds you have left. If you plant 20 tomato seeds and only have 25 total, you know you're running low.
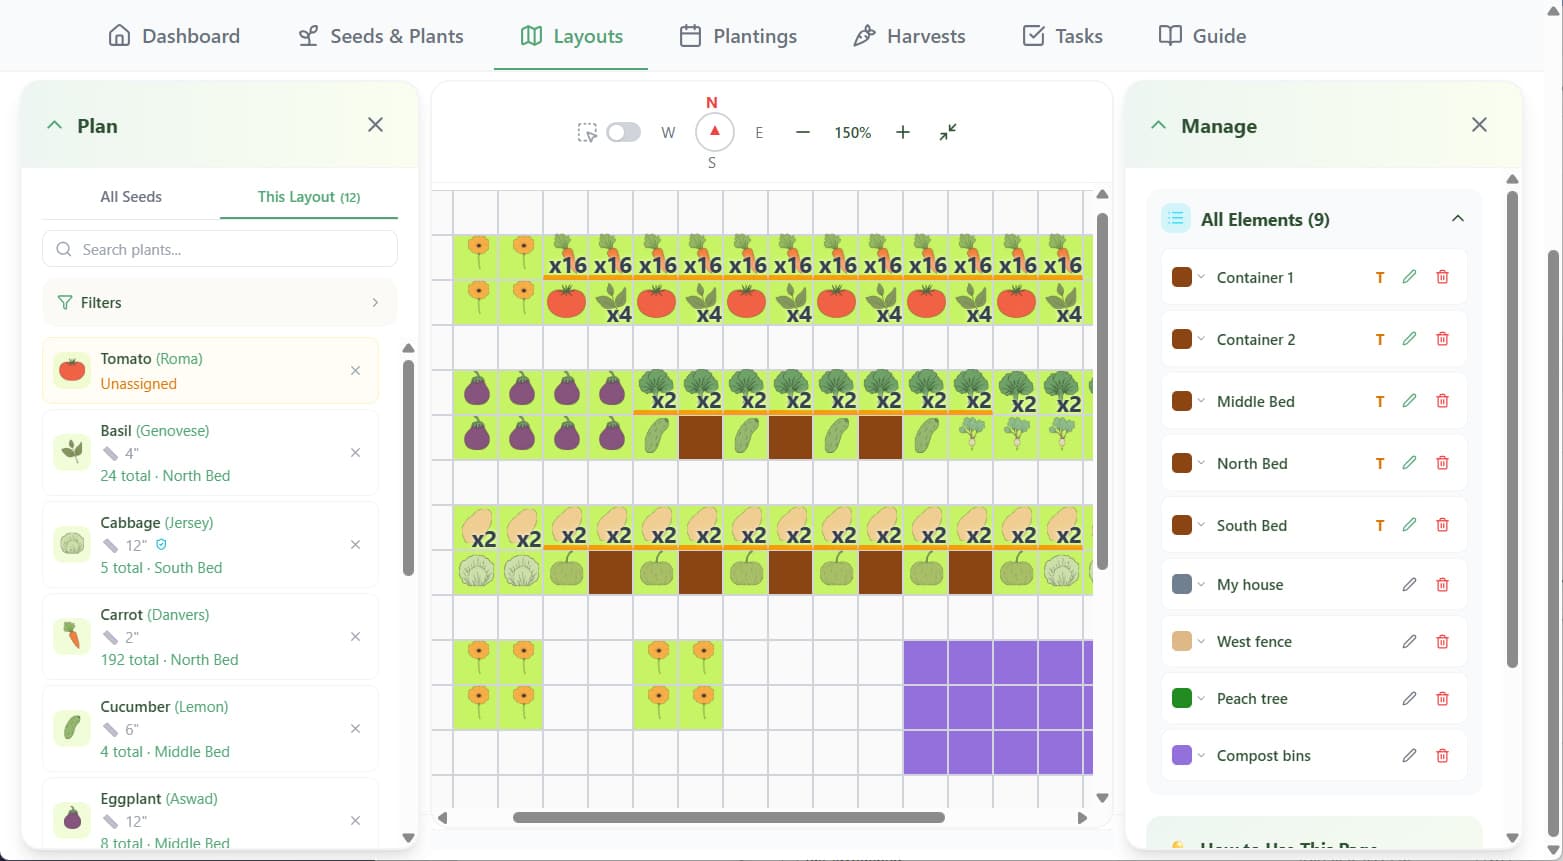
Step 3: Map Your Actual Garden Space
Now it's time to create your garden layout.
Go to the Layouts page in Giddy Carrot. This is where you recreate your actual garden space digitally.
The layout page uses a grid where one cell equals one square foot. You'll add garden beds, greenhouses, fences, trees, and other structures in the orientation they actually exist in your space.
Why this matters: You need to visualize sun exposure, shade patterns, and access paths. A bed that gets afternoon shade from a tree needs cool-season crops or shade-tolerant plants. A bed in full sun all day can handle heat-loving plants like tomatoes and peppers.
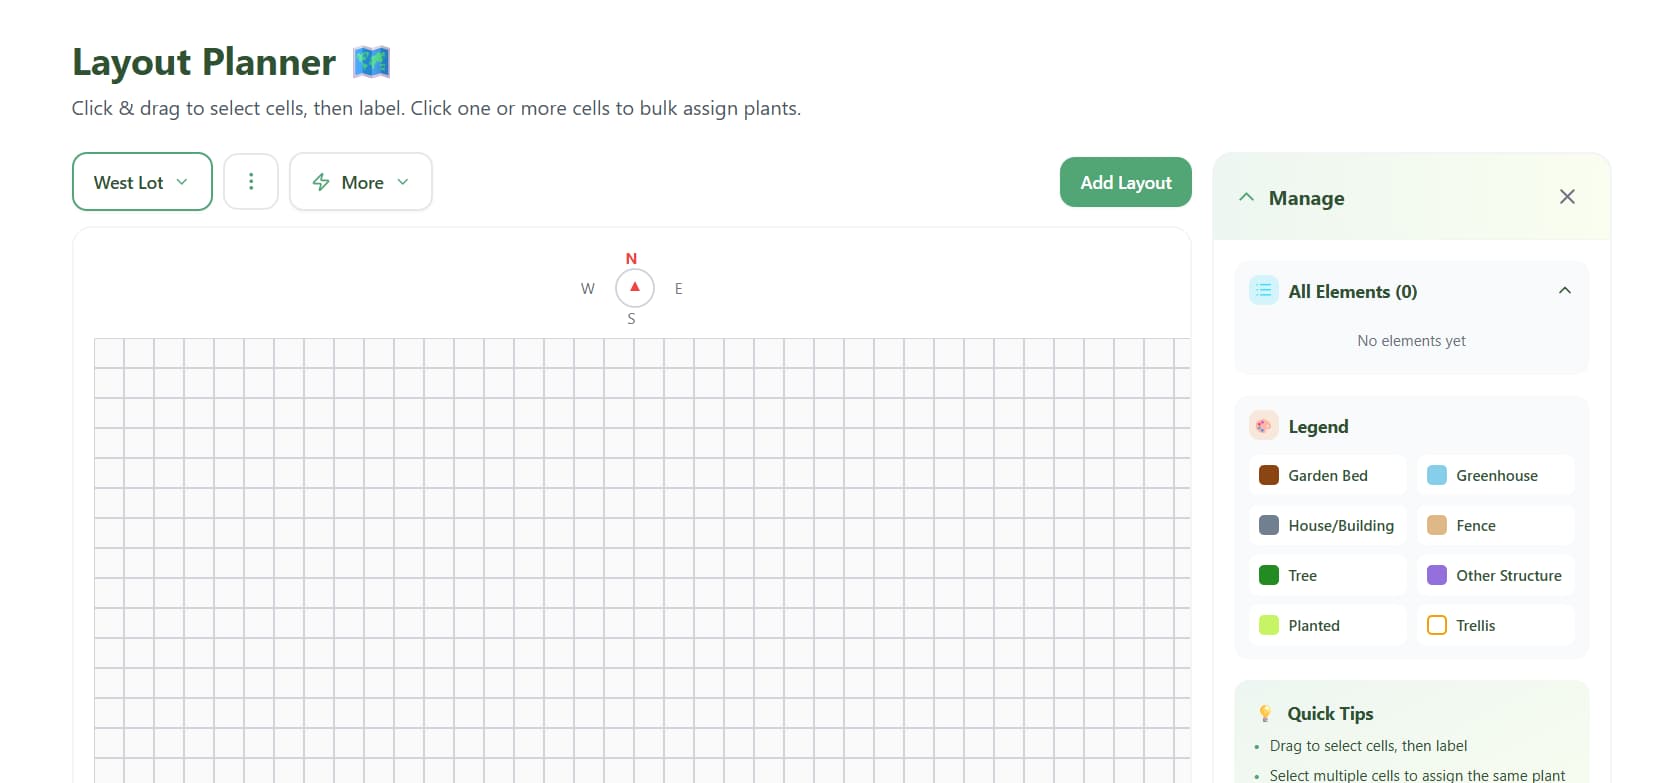
Add your beds: Click and drag to create beds in the sizes and positions that match your real garden. If you have a 4x8 bed in the northwest corner, recreate it in that position on the grid.
Add structures: Mark fences, greenhouses, sheds, trees, or anything that affects sun exposure or plant placement.
Add trellises to beds: Manage beds and add trellis markers where you plan to grow vertical crops. This helps you visualize where vining plants like cucumbers, beans, and tomatoes will go so you don't accidentally plant full sun crops directly underneath.
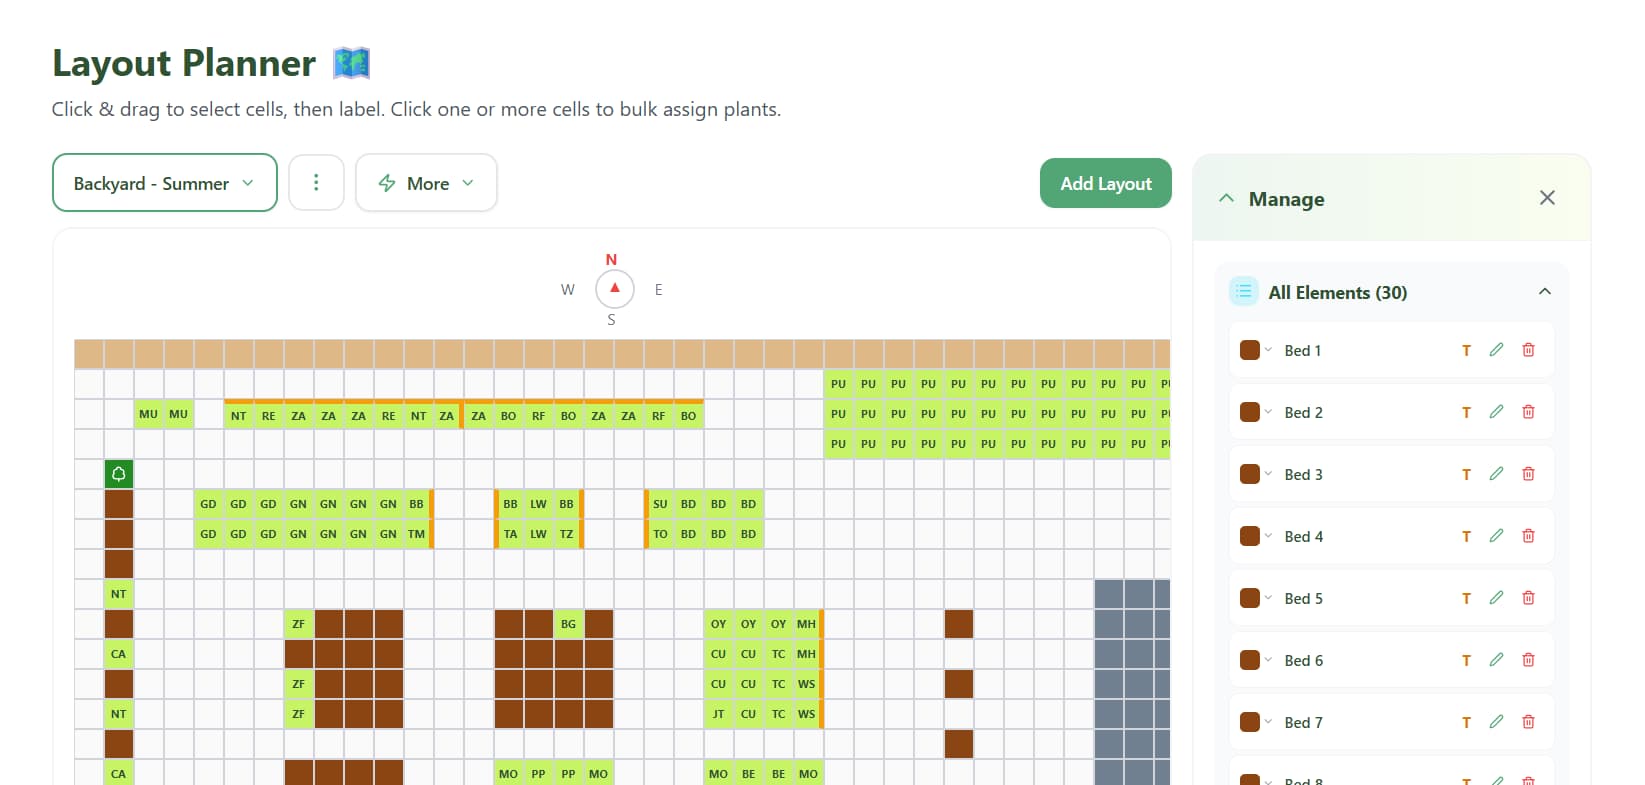
This visual reference is incredibly helpful. You can see your entire garden at a glance and make smarter decisions about what goes where.
Step 4: Assign Plants to Beds
Once your beds are set up, start assigning plants.
Click into a bed. You'll see the grid of square-foot cells. Click one or multiple cells to select them, then choose a plant from your seed list.
For example:
- Select 4 cells in a row, assign "Cherokee Purple Tomato," set quantity to 1 per cell (because tomatoes need 1-2 square feet each)
- Select 16 cells in a corner, assign "Radish," set quantity to 16 per cell (because radishes are small and you can fit 16 per square foot)
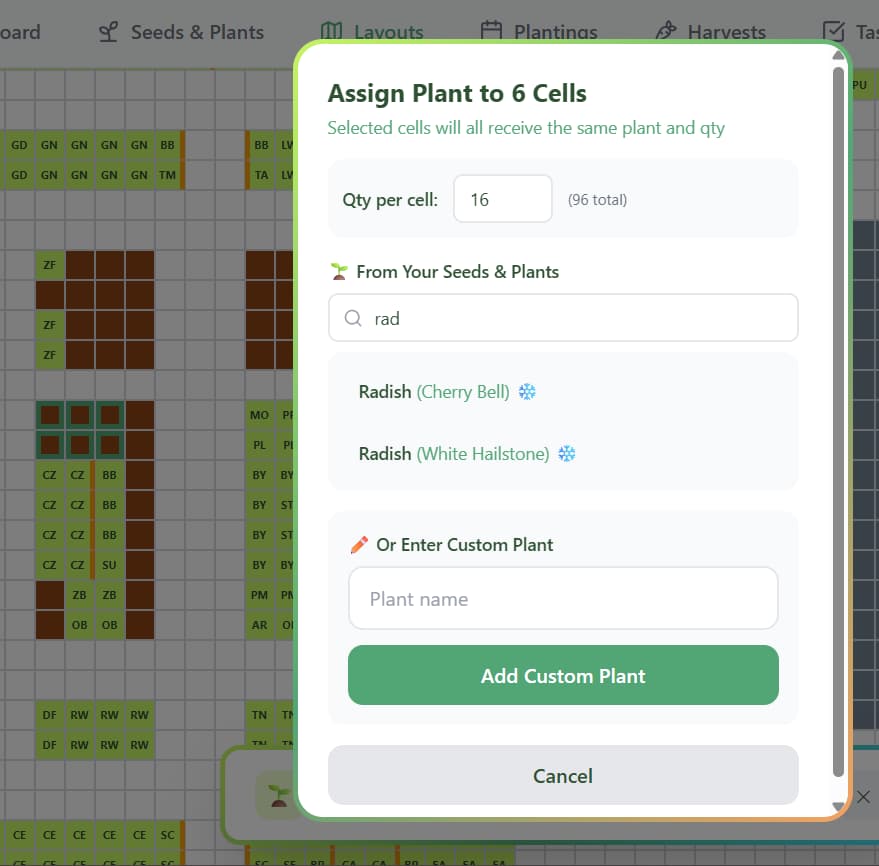
You can assign plants quickly by selecting multiple cells at once. This is way faster than planning on paper or trying to remember what you planted where.
As you assign plants, think about:
- Companion planting: Put plants that work well together, add flowers to your beds to encourage pollination
- Sun requirements: Lettuce and spinach in areas that get afternoon shade, tomatoes and peppers in full sun
- Succession planting: Leave some cells empty or plan to replant after early crops finish (more on this in a minute)
Pro tip: If you have Giddy Carrot Pro, you can create multiple layouts for different seasons. Clone your spring layout, then modify it for summer and fall plantings. This makes succession planning visual and easy.
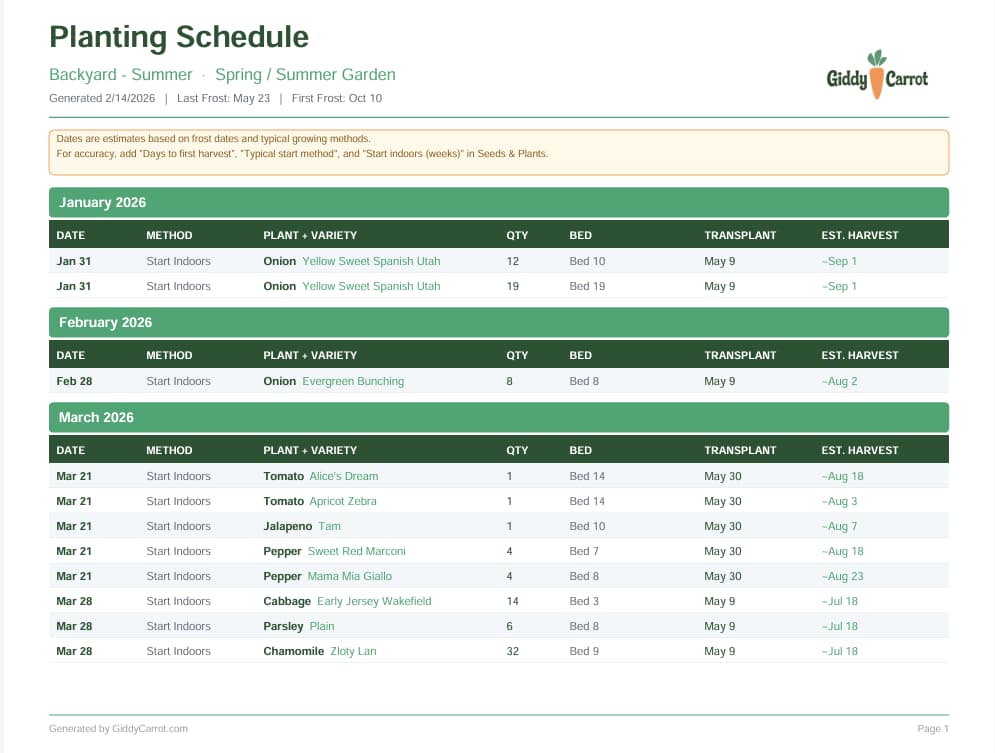
Step 5: Generate Your Planting Schedule Automatically
Here's where Giddy Carrot saves you a ton of time.
Once you've assigned plants to beds, you can automatically generate planting records for everything in your layout. The app knows:
- Your frost dates (you enter these once on your dashboard)
- Whether each plant is cool-season or warm-season
- How many weeks before or after your last frost date to start seeds indoors or direct sow
Click "Generate Plantings from Layout" and the app creates planting records with start dates, transplant dates, and harvest estimates already filled in.
All these plantings also automatically appear on your Tasks page so you get reminders when it's time to start seeds.
If you don't have Pro, you can still add plantings manually. It just takes a little more time, but you can still batch add plantings that you plan to start on the same day which helps save time.
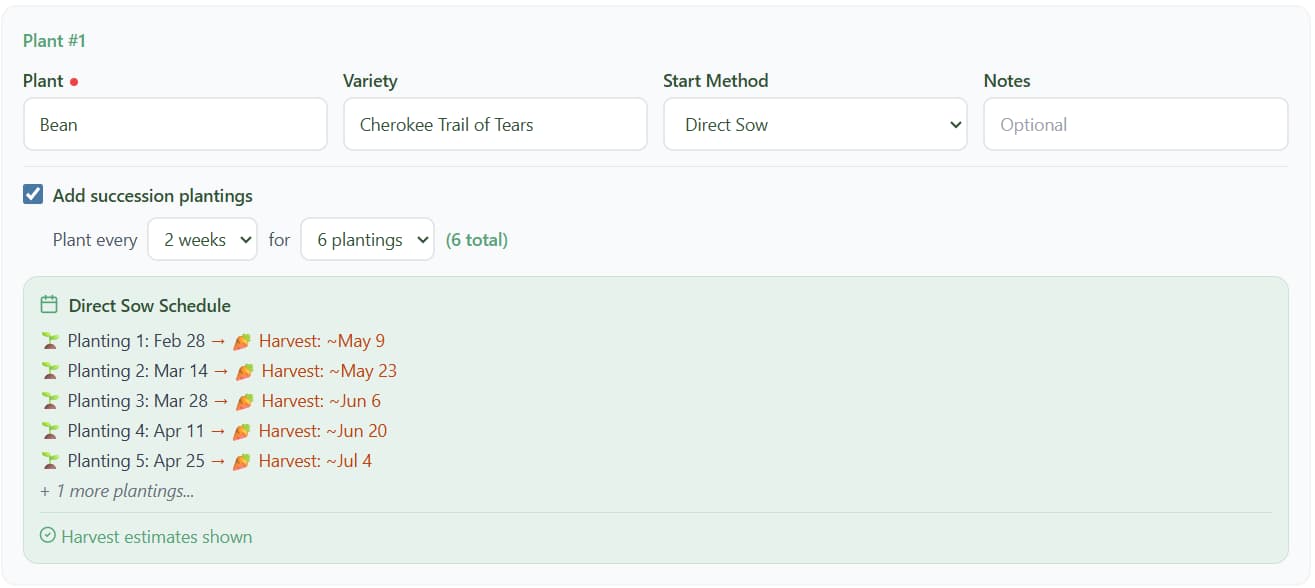
Succession planting: For crops like lettuce, radishes, and beans that you want to harvest continuously, you can create succession plantings directly from the planting schedule. The app will automatically stagger the dates so you're planting a new batch every 2-3 weeks.
Step 5.5: Track What Actually Happens (Not Just the Plan)
Planning is one thing. Reality is another.
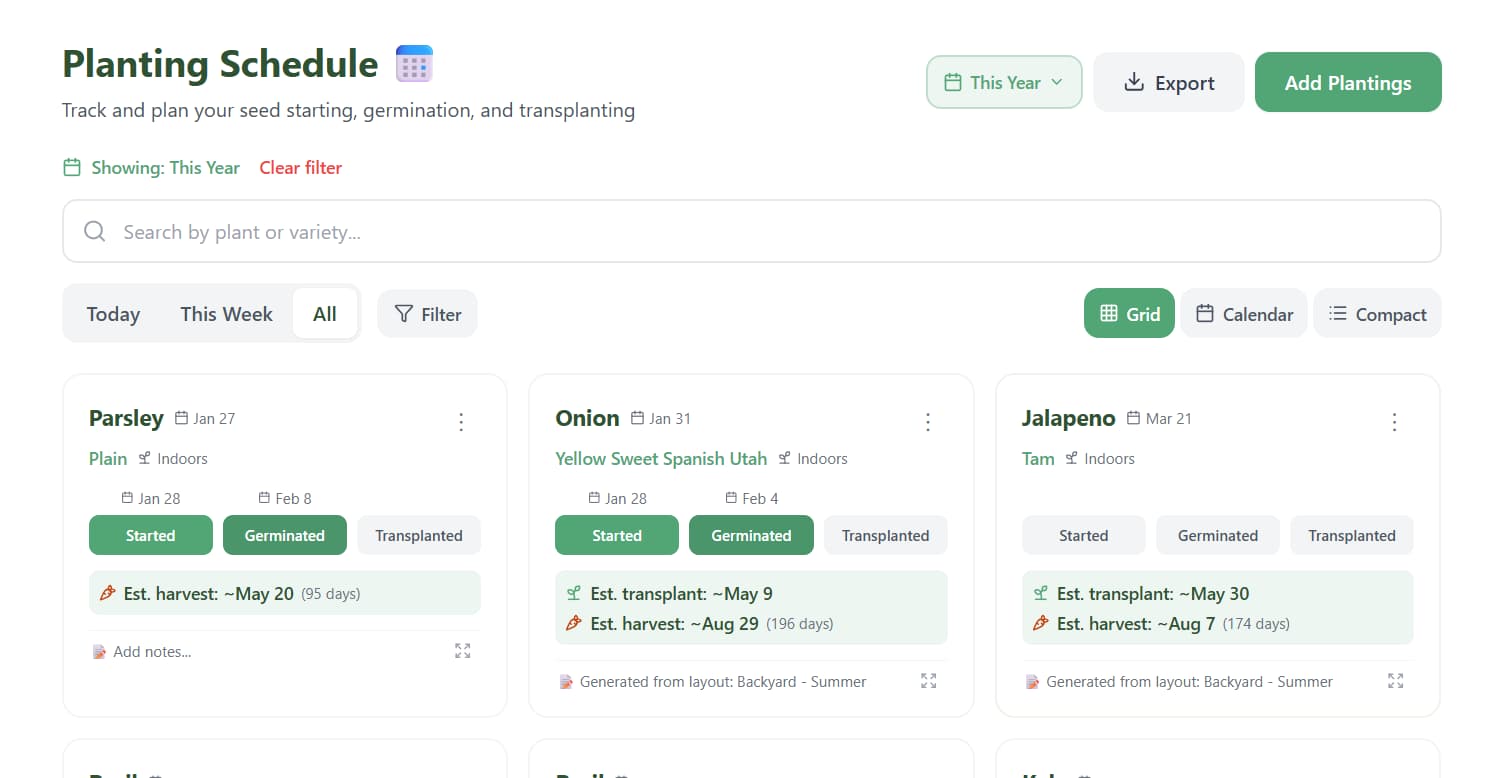
In the Planting Schedule, you can track the actual progress of each planting:
- Mark when you planned to start seeds
- Log when you actually started them (one click logs the date)
- Record when they germinated
- Note when you transplanted them (if started indoors)
- Add notes throughout the season about plant progress
This creates a timeline of what actually happened vs. what you planned. Over time, you'll see patterns. Maybe your tomatoes always germinate faster than the seed packet says. Maybe your lettuce takes an extra week to germinate in early spring because your soil is still cold. This real-world data helps you plan better next year.
Logging failures: Not everything succeeds. Seeds don't germinate, transplants die, pests destroy plants, weather kills crops. It happens.
You can log failures directly in the planting schedule. Mark whether the failure was due to:
- Disease
- Poor germination
- Pests/insects
- Transplant shock
- Weather
- Other reasons
You can mark a planting as a complete failure or specify how many plants out of the total failed (e.g., 5 out of 12 tomato seedlings didn't make it).
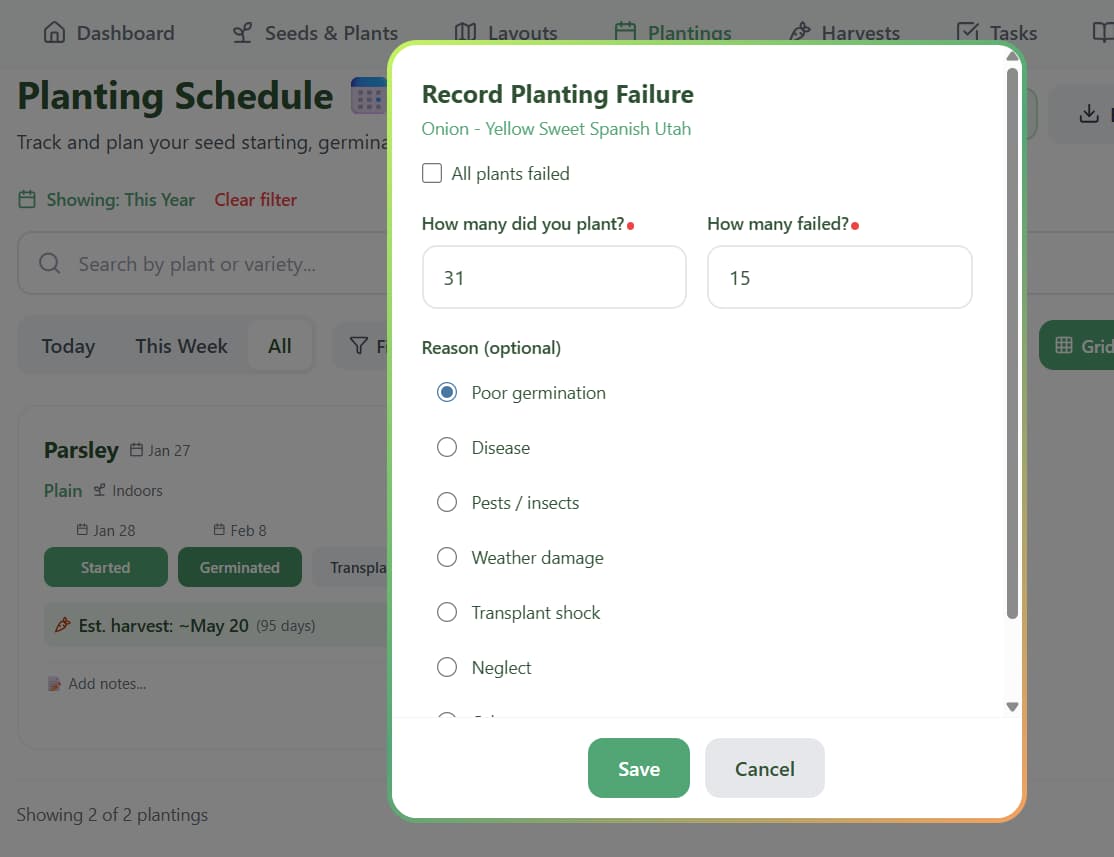
Why this matters: You can filter your plantings to show only failures. This helps you identify patterns. If three different plantings failed due to transplant shock, maybe you're transplanting too early or not hardening off properly. If multiple plantings in one bed failed due to disease, maybe that bed needs better crop rotation or soil amendment.
Failure data is just as valuable as harvest data. It shows you what to avoid next year.
Step 6: Print Your Planting Schedule
Once your planting schedule is set, you can export it as a PDF. This gives you a physical reference for the garden that shows:
- What to plant
- How many
- Which bed
- When to start indoors or direct sow
I keep a printed copy in my garden shed. It's helpful when I'm outside and don't want to pull out my phone.
Step 7: Track Your Harvests
A productive garden means continuous harvests, not just one big harvest in August.
As you harvest, log what you pick in the Harvests page. You can enter:
- What you harvested (variety name)
- How much (weight)
- Date
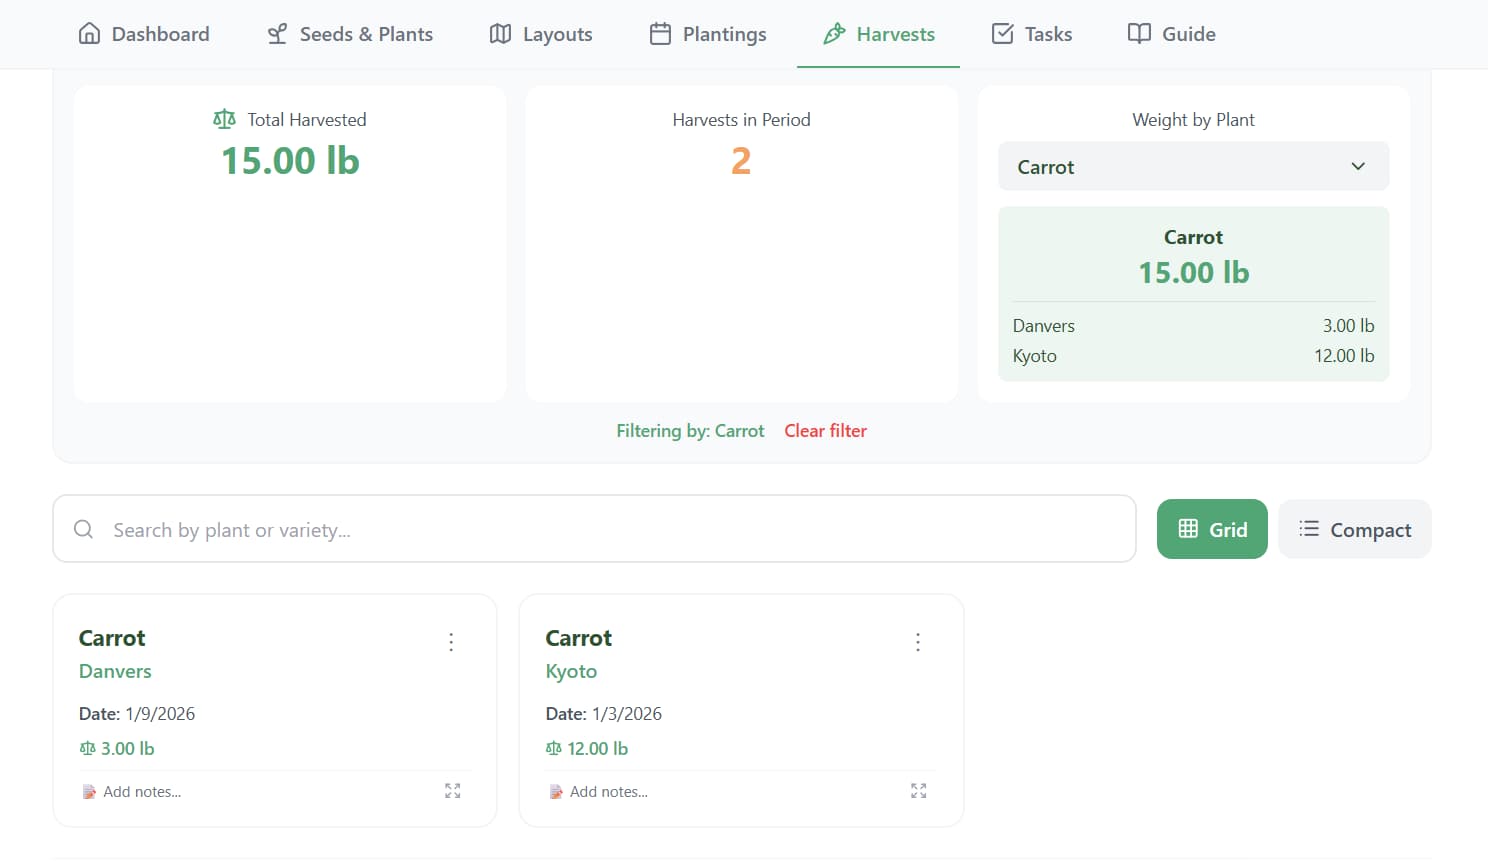
Over time, this data shows you which varieties actually perform well in your garden. You might plant three types of tomatoes and discover one variety consistently produces twice as much as the others. Next year, you plant more of that variety.
What Makes a Garden Productive?
A productive garden isn't just about yield. It's about:
Efficient use of space: Vertical growing, succession planting, interplanting fast and slow crops so nothing sits empty.
Continuous harvests: Not everything ripens at once. You're picking something every week from spring through fall.
Less waste: You're growing what you actually eat, not letting half your zucchini rot because you planted too much.
Learning what works: Tracking which varieties perform best in your specific conditions so you improve every year.
Giddy Carrot helps with all of this. The layout tool shows you how to maximize space visually. The planting schedule handles succession planting automatically. The harvest tracker shows you which varieties are worth growing again.
Common Planning Mistakes (And How to Avoid Them)
Planting too much at once: New gardeners plant everything in May and then get overwhelmed in July when it all ripens simultaneously. Use succession planting. Stagger your crops.
Forgetting about frost dates: You start tomatoes too early and they sit indoors getting leggy because it's still too cold to transplant. Let the app calculate start dates based on your frost dates. Don't guess.
Ignoring sun patterns: You plant lettuce in full sun and it bolts in three weeks. Walk your garden at different times of day. Note where shade falls. Plan accordingly.
Not tracking anything: You have a great year but can't remember which tomato variety produced so well. Log your harvests. Write notes. Your memory isn't reliable across seasons.
Start Simple, Improve Each Year
You don't need to plan a perfect garden. You need to plan a functional garden and improve it over time.
Start with 4-6 crops you know you'll eat. Map your space. Assign plants. Let the app handle the planting schedule. Track your harvests.
Next year, you'll have data. You'll know which varieties worked, which beds produced the most, and which planting dates were too early or too late. Use that information to adjust your plan.
Gardening is iterative. Every season teaches you something. The goal isn't perfection in year one. The goal is a system that helps you learn and improve.
Want to try planning your garden digitally? Giddy Carrot's free version includes layout planning, planting schedules, and harvest tracking. It takes the guesswork out of spacing and timing so you can focus on actually growing food.
Download Your Free Vegetable Planting Guide
Get instant access to planting data for 65 vegetables, herbs, and flowers — spacing, timing, sowing depth, and start method for every crop.
We respect your inbox. Unsubscribe anytime.
Related Articles

Why Your Vegetable Varieties Matter More Than You Think
Choosing the wrong tomato variety cost me two seasons of early disease. One onion mistake meant no bulbs — ever. Here's what I learned about matching varieties to your climate.
Companion Planting: What the Science Actually Says (And What You Can Stop Worrying About)
Most companion planting lists were never scientifically tested. Here's what research actually supports — and why one simple change made the biggest difference in my garden.
I Built the Garden Planning App I Couldn't Find Anywhere Else
Most garden apps plan one bed at a time. Giddy Carrot's Layout Planner maps your whole space — and finally gives you a system for deciding what goes where.